The Importance of Heading Styles in Microsoft Word: A Guide for Novelists

Dear novelists,
Take a minute to learn how to use heading styles in Microsoft Word and save yourself unnecessary frustration during the editing and formatting stages.
But wait a minute. What exactly is a heading style?
A heading style in Microsoft Word is a predefined set of formatting options that you can apply to text to indicate different levels of heading hierarchy within a document. These styles help organize your manuscript, making it easier to navigate and manage. By using heading styles, you can ensure consistent formatting and easily make global changes to your headings.

Why You Should Use Heading Styles
- Efficient Navigation: Heading styles create a structure that lets you quickly jump to different parts of your manuscript using the navigation pane.
- Consistent Formatting: Heading styles ensure consistent formatting throughout your document and make it easy to adjust formatting globally.
- Ease for Editors: Editors can easily find and reference sections, chapters, and other key parts of your manuscript.
- Automatic Table of Contents: You can automatically insert a table of contents that is easily updated to reflect ongoing revisions.
How to Use Heading Styles in Microsoft Word
1. Applying Heading Styles
Sections (Part One, Part Two, etc.)
- Select the text you want to use as a section heading.
- Go to the “Home” tab.
- Choose “Heading 1” from the Styles group.

Chapters
- Select your chapter title.
- In the “Home” tab, select “Heading 2” from the Styles group.

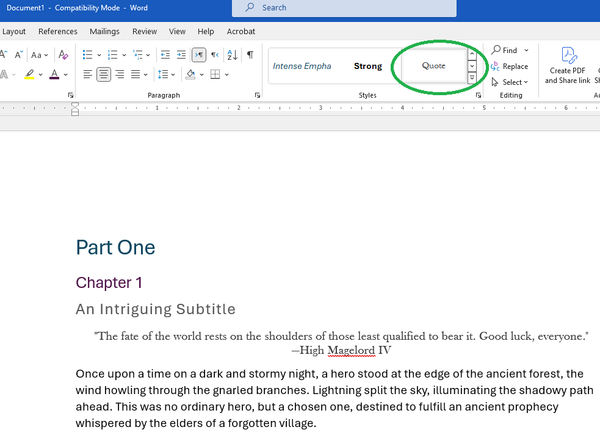
Chapter Subtitles
- Highlight your chapter subtitle.
- In the “Home” tab, select “Subtitle” from the Styles group.
(Note that "Subtitle" is outside the heading hierarchy, so it won't show up in the document's navigation. If you'd rather your subtitles be included, use "Heading 3" instead. More on "non-navigational styles in a moment.)

Flavor Text and Customizing Styles for Different Needs
Let's say you want to add a world-building quote at the beginning of each chapter that will be in a different format than the body of the manuscript. For example, the "flavor text" quote will be centered, single-spaced, and in a different font. By setting up this custom style, you won't have to manually reformat every instance of flavor text throughout the document.
- Highlight the flavor text (e.g., quotes at the start of chapters).
- Create a new style for this specific text. To do this, you can either right-click on any existing style, select “Modify,” and customize it as needed, or you can create a new style from scratch.
Modifying an existing style:

Creating a new custom style:

And here's what the modified style looks like for the world-building quote:
Non-Navigational Styles
Not all styles are for headings. Styles like Normal, Quote, and custom styles can be used to ensure consistent formatting without affecting the document’s navigation. So, with the above examples, Part One and Chapter 1 will appear in the navigation, but the subtitle, flavor text, and body paragraph will not.
2. Modifying Styles
As with the flavor text example, you can modify any of these styles at any time, and doing so will change ALL instances of that style throughout your manuscript. So, for example, if you decide you want your chapter titles to be slightly larger, you can change them all at once rather than the tedious alternative of scrolling through your entire document and increasing the font size one at a time.
Adjusting Formatting for All Instances
- Right-click on the style you want to modify (e.g., Heading 1, Heading 2).
- Select “Modify.”
- Make your desired changes (font, size, color, alignment).
- Click “OK” to apply changes to all instances of that style in your document.
In this case, I'm making the chapter titles dark green and increasing the font by two points:

Making the Most of the "Normal" Style
"Normal" is the first style in the list by default. In older versions of Word, this style was called "Body." It's the style you want to use for most of the text in your document.
By using the Normal style effectively, you ensure that your manuscript has a consistent format. This is crucial when it comes time for final formatting because, for example, you won’t have to go through and remove a whole bunch of unnecessary line returns or adjust individual paragraphs. For example, imagine having to remove hundreds of unnecessary line breaks manually—setting the style correctly from the start will save you a lot of time and frustration.
3. Creating a Table of Contents
- Place your cursor where you want the Table of Contents to appear.
- Go to the “References” tab.
- Click “Table of Contents” and choose an automatic style.
The table of contents will be generated based on your heading styles (which you can modify to your heart's content).

And here's what that looks like, based on the hierarchy we set up with the heading styles:

4. Using the Navigation Pane
While you're working in Word, you don't necessarily need to insert a table of contents right into the document. That's because you already have the style-based navigation at your fingertips.
- Open the navigation pane by going to the “View” tab and checking the “Navigation Pane” box.
- Click on headings in the navigation pane to quickly move to different parts of your document.

Another benefit of using the navigation pane is you can drag and drop sections to move them around within the document. For example, maybe you've decided that the scene in Chapter 3 should actually come before Chapter 2. Drag and drop for an easy swap.

In Conclusion
Using heading styles in Microsoft Word not only simplifies the writing and editing process but also ensures your manuscript is professionally formatted and ready for publication. Spend some time getting familiar with these tools. It will save you a lot of tedium down the road!

David Griffin Brown is an award-winning short fiction writer and co-author of Immersion and Emotion: The Two Pillars of Storytelling. He holds a BA in anthropology from UVic and an MFA in creative writing from UBC, and his writing has been published in literary magazines such as the Malahat Review and Grain. In 2022, he was the recipient of a New Artist grant from the Canada Council for the Arts. David founded Darling Axe Editing in 2018, and as part of his Book Broker interview series, he has compiled querying advice from over 100 literary agents. He lives in Victoria, Canada, on the traditional territory of the Songhees and Esquimalt Nations.

About the Darling Axe
Our editors are industry professionals and award-winning writers. We offer narrative development, editing, and coaching for every stage of your manuscript's journey to publication.

Related Posts

Story Skeleton—Of Mice and Men

Think Outside the Bot: AI Prompt-Crafting for Authors